My 3D printing setup
I have had 3D printers in the house since 2015. But it took 5 years and a lot of frustration until I finally got to a setup where I am happy with what I am doing.
It began with a positively tiny M3D Micro — a very basic, consumer-grade 3D printer with a proprietary slicing software, no heated build bed, and not a lot of power. Especially the very small print area coupled with no heated bed made it a device I never really got a lot of use out of.
Eventually I upgraded to a CR-10S, then later tried to replace that with an Artillery Sidewinder, but the gist is: I love 3D printing, but not tinkering with 3D printers. And most, if not all of the <1000 Euro devices are in the end things you need to tinker with. Replacing the fan shrouds, choosing the correct hot ends and nozzles, upgrading the mechanics, the software, writing your own configuration files and measuring e‑steps… it is the equivalent of owning a vintage car, so you can get your hands greasy.
Which is not me, so after the printer again ate all the filament and had the nozzle or extruder clogged, I gave all of the stuff away to a local maker space and was ready to give up on the hobby completely.
Based on the insight that there are printers made for me though, I finally caved and spent way more money than I initially intended for this hobby and bought an Ultimaker 3, quickly followed by an Anycubic Photon Mono SE. As a result, this is my setup:
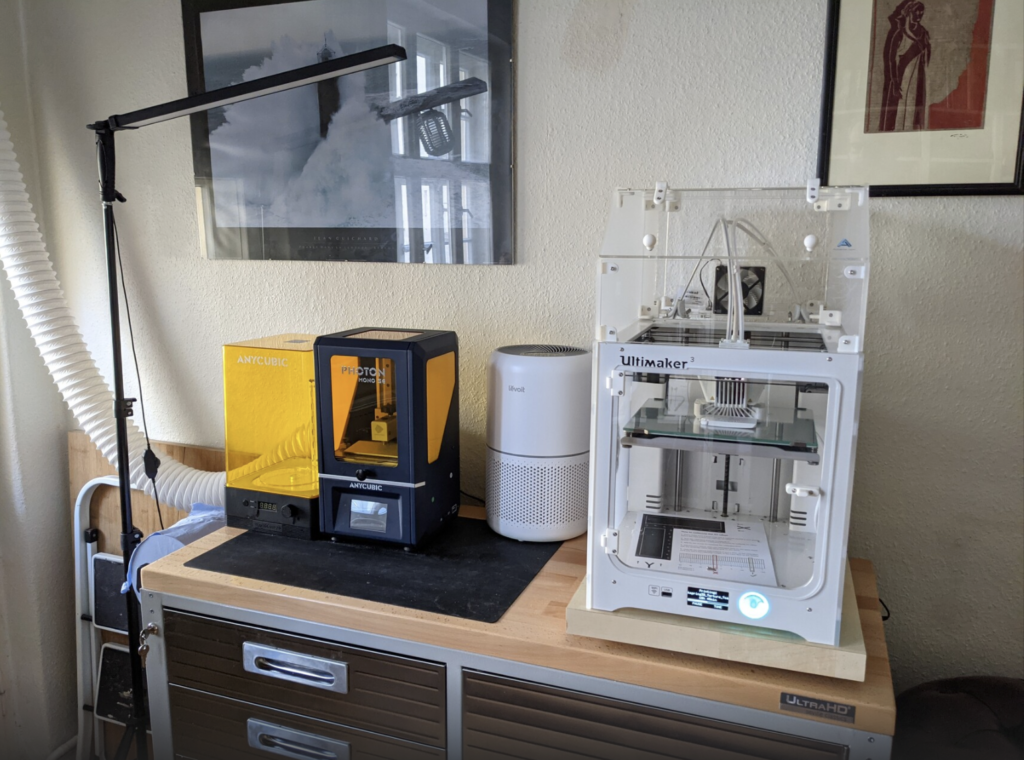
The sideboard is a workbench-on-wheels, so I can move it around in a pinch. It houses all the accessories for the printers: Extra filament, resins, isopropanol for cleaning resin prints, breathing mask, nitrile gloves, extra paper towel rolls, small tools, and so on.
On top of the workbench, you find the Ultimaker 3 (UM3), sitting on a thick countertop mounted on a rotating swivel. I added that because the filament spools are attached to the back of the printer, which is also where the feeding mechanism is. Getting to those is a bit hard, so having it easily swivel is a pretty handy thing. The heavy countertop helps to minimize vibrations spilling over onto the print.
The UM3 is a Fused Filament Fabrication printer that takes spools of plastic filament, forces it into a hot metal tube where it melts and then through a fine nozzle drawing a line. Through an assortment of gantries and motors, it can draw these lines into basically any shape, lowering the print bed gradually to build up a true 3D model. The good thing with the UM3 is that it is designed for commercial use. That means that it comes with a good workflow for easy handling, and has parts that can be swapped out without any hassle. It „just works“. And when I want a finer or bigger nozzle, to have more details or more speed, I can swap those out in a few seconds without any special tools.
I also added a hood on top of it, to keep the warm air inside, which tends to make things a bit more reliable. But that is it really for modifications — otherwise, this is a stock printer. And I must say: For functional parts or bigger things, this is a very good machine, and I am very happy with it.
Next to the Ultimaker is a small air filter. I run that whenever I am printing with resin or filaments that emit obnoxious fumes. It has a VOC (volatile organic compounds) filter too, for extra safety.
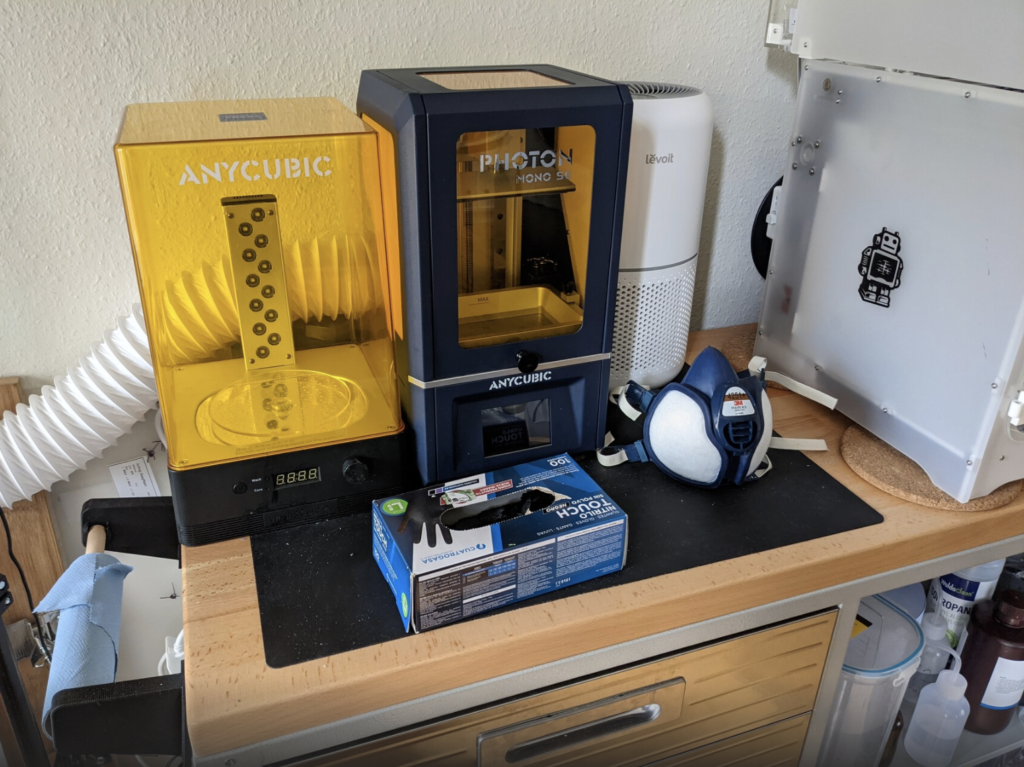
Next to that is the Photon Mono SE, a masked stereolithography, or MSLA printer. It works by shining UV light through an LCD screen onto the transparent vat filled with resin. The screen lets only parts of the UV light through, and where the resin is exposed to it, it hardens. Then the build platform is raised a bit, liquid resin flows into the gap, and the process resumes until a threedimensional object appears from the toxic goo.
The upside with these printers is that they are insanely detailed. The downside is that their build volume tends to be rather small. The other upside though is that they are mechanically dead simple: Just a platform that moves up and down. That means that the main pricing factor is the LCD screen that blocks the UV light. As a result, even the cheap versions of these printers can be pretty good. You pay more if they are larger, faster, or have a better resolution (but keep in mind that the cheapest MSLA printer will probably blow the most expensive FFF printer out of the water in terms of resolution!)
The Mono SE that I have is a mid-priced one. It has a higher resolution and is a lot faster than the cheaper options. Also, the housing is made of metal, and that kinda appealed to me.
The printer and the Wash&Cure station next to it sits on a silicone mat, to make resin cleanup a bit easier. Because trust me: That stuff is nasty, and you do not want it on your skin, nor in your eyeballs or lungs! It is thankfully pretty easy to protect yourself though: Wear nitrile gloves and a respirator, or at least a paper mask plus eye protection in case of splashes (I already wear glasses anyway, because I have bad eyesight). While the printer runs, ensure you have good ventilation. I added a 4″ hose to the back of the printer and use that to draw the fumes out of the flat, which works surprisingly well. The active air filter is just an extra precaution on my end.
Functionally, the printer is otherwise stock too — although I added a few accessories:
- a lid for the resin vat, so I don’t need to always put the resin back into the bottle between prints
- a small plastic gizmo that allows me to hang the build plate over the vat at an angle, so the remaining resin can safely drip back onto the vat
- a magnetic build surface. A sheet of spring steel that is magnetically attached to the build platform. When the print is done, I can simply pop off the models instead of having to handle a scraper, or worse…
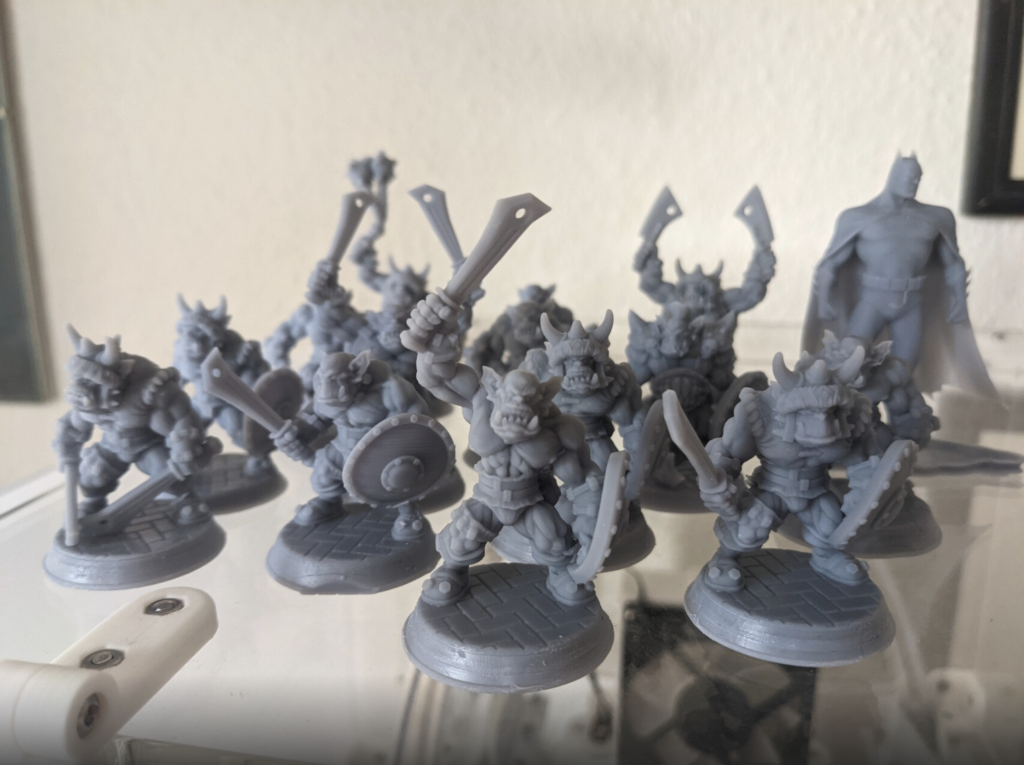
The last thing on the table is the Wash & Cure station. Once the prints are done, I’ll pop them into a wire basket and drop that into a bucket of isopropanol. The bucket has a magnetic impeller at the bottom, and the W&C station has a motor that makes it spin, thus agitating the isopropanol and giving the prints a good rinse, washing off all remaining liquid resin. Once done, I dry the prints and replace the bin with a rotating plate on the W&C station. The prints get put onto that, a UV safe hood on and then the station slowly rotates the plate while exposing the prints to more UV light. That „cures“ the prints, so they don’t feel sticky anymore and are properly hardened. The results are frankly astounding:
At the side of the workbench is a holder for a roll of lint-free paper towels, to clean up messes and such.
Overall, I am quite happy with the current setup. Everything works fine, and I can start FFF prints from my desk (the UM3 has wifi). For MSLA prints, I still handle a USB stick, but that is actually fine for me, as I need to go there anyway to pour resin, prep the surface with paper towels, etc.
On the computer side, I use the following resources:
- tinkercad.com and Microsofts 3D builder for creating or modifying models
- thingiverse.com, myminifactory.com and thangs.com to get new models. (Also various Kickstarters. The Orcs from the picture above are from this campaign.
- For the UM3, I prepare the prints with Ultimaker Cura (which can read the printers settings and inserted filaments through the network and also sends the print jobs directly to the printer)
- For the Mono SE I am still figuring things out, so I am switching between the Photon Workshop that came with the printer and Lychee slicer. The latter seems nicer, but won’t work without registering and connecting to their cloud on every use.
Schreibe einen Kommentar